

Mushroom Paradise
BEGINNER'S GUIDE
Are you a mushroom-growing virgin? No worries! Our beginner-friendly guide will help you start with a grow kit and harvest your first mushrooms with confidence.
INTERMEDIATE'S GUIDE
If you’ve already mastered the art of growing beginner-friendly mushrooms, it’s time to flex and dive into the world of Golden Oysters, Black Pearl Oysters, and Lion’s Mane mushrooms.

PROFESSIONAL'S GUIDE
Grow your own harvest from scratch. This guide covers the essential tools, inoculation techniques, and best practices for harvesting mushrooms.

HOW TO GROW MUSHROOMS USING A MUSHROOM GROW KIT?
Whether you’re a total newbie or just looking for an easy way to grow fresh mushrooms at home, this guide will walk you through the steps to successfully grow mushrooms using a mushroom grow kit.
EASY WAY TO START
Whether you’re a beginner or just short on time, mushroom grow kits make it simple:
- Beginner-friendly – the perfect way to start, no prior experience needed.
- Pre-colonised and ready to grow – our kits come with live mycelium already thriving.
- Minimal effort – no complicated equipment or lab coats required.
- Quick results – harvest your first mushrooms in as little as 1–2 weeks.
WHAT’S IN THE BOX?
UNGU mushroom grow kits include:
- A block of pre-colonised substrate (the growing medium with mycelium)
- A humidity bag
- Funky packaging – because growing mushrooms should look as good as it tastes
WHAT KIND OF MUSHROOMS CAN YOU GROW?
We offer a variety of beginner-friendly grow kits. Whether you want a delicate, nutty flavour or something earthy and bold, we’ve got you covered:
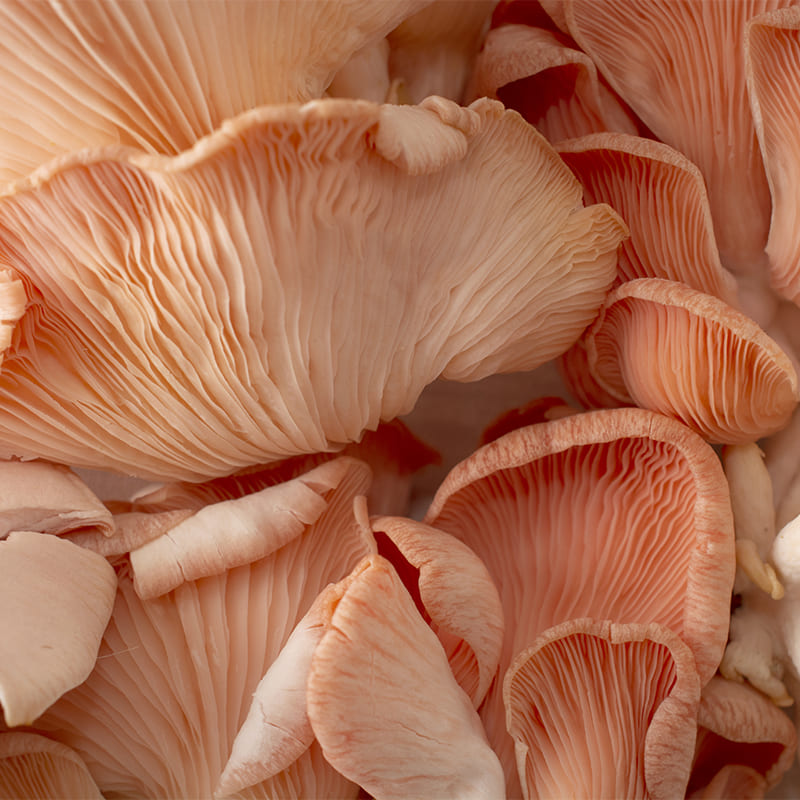
- Pink oyster (Pleurotus djamor) – a strikingly beautiful pink mushroom with a delicate, slightly sweet flavour.
- White pearl oyster (Pleurotus ostreatus) – a classic, meaty mushroom with a mild, nutty flavour.
- Blue oyster (Pleurotus ostreatus) – beautiful blue-grey caps with a rich, velvety texture.
- Chestnut mushroom (Pholiota adiposa) – a golden-brown mushroom with a firm bite and earthy aroma.
- Reishi mushroom (Reishi, Ganoderma lucidum) – a powerful medicinal mushroom with a woody texture and deep, complex flavour.
HOW TO GROW MUSHROOMS WITH YOUR KIT
Step 1: Unbox & inspect
Open the box and carefully unfold the plastic to free the bag’s filter opening, allowing it to fill with air.
Step 2: Find the perfect spot
Mushrooms like it cool, humid, and out of direct sunlight. The ideal conditions are:
- Temperature: 15–22°C – just the right range for the varieties in our kits.
- Lighting: soft, indirect light—think shade rather than sunbathing.
- Humidity: high humidity is key for good growth, so avoid placing your kit near radiators or direct heat.
- Airflow: some air circulation is good, but keep the kit away from strong drafts.
Step 3: Prepare the kit
- Open the marked areas of the plastic to let the mushrooms grow.
- Follow the included instructions, as some varieties have different needs.
Step 4: Keep it moist
Mushrooms love moisture, but not too much! To keep humidity levels just right:
- Mist the grow kit 2–3 times a day using a spray bottle with clean water.
- Your kit comes with a humidity bag—keep it on to maintain the perfect moisture balance.
- Allow for some airflow to prevent mould but avoid strong drafts.
Step 5: Harvest your mushrooms
Your mushrooms are ready to harvest when their caps are fully open but before they start dropping spores.
- To harvest, gently twist and pull or use a clean knife to cut them at the base.
Step 6: Go for round two (or more!)
Most kits don’t stop at just one flush! After your first harvest:
- Continue misting the block regularly.
- Keep the humidity bag on and maintain good airflow.
- A second or even third flush may grow in a few weeks!
FINAL TIPS FOR SUCCESS
- Be patient – each mushroom variety grows at its own pace.
- Keep it humid – mushrooms thrive in a moist environment.
- Stay clean – always wash your hands before handling your grow kit.
- Store smart – keep harvested mushrooms in a paper bag in the fridge to keep them fresh longer.
With an UNGU mushroom grow kit, you can grow your own gourmet mushrooms with minimal effort—perfect for beginners and busy food lovers alike. Whether you’re after delicious oyster mushrooms, nutty chestnuts, or the superfood power of reishi, we’ve got everything you need to get growing.
Happy growing! 🍄
A GUIDE TO SKILLED MUSHROOM GROW KIT USERS
If you’ve already mastered the art of growing beginner-friendly mushrooms, it’s time to flex and dive into the world of Golden Oysters, Black Pearl Oysters, and Lion’s Mane mushrooms.
GETTING TO KNOW YOUR NEW FLING
1. Golden Oyster (Pleurotus citrinopileatus)
A favourite among nut-flavour lovers. This aromatic mushroom, reminiscent of cashews, when panko-fried, can tell shrimp appetisers and chicken nuggets to hold their beer. Golden Oyster mushrooms are perfect for risotto and pasta dishes. With proper hydration, you’ll get multiple harvests—sometimes twice, maybe even three times. Rich in antioxidants and nutrients like potassium and zinc, they’re great for boosting overall health and immune function.
2. Black Pearl Oyster (Pleurotus ostreatus – hybrid)
A love child of Asian and European oyster mushrooms, delivering an umami punch with a sweet nutty aftertaste. Perfect for procrastinators—the kit can hang out in the fridge for up to a month, and harvested mushrooms stay fresh for up to two weeks. In the kitchen, Black Pearls are versatile. Sauté, grill, roast, or toss them into soups and stews—they’re best friends with garlic, rosemary, and balsamic. Nutritionally, they’re packed with vitamins B and D, plus selenium and copper.
3. Lion’s Mane (Hericium erinaceus)
If your always-bogged-down colleague suddenly seems laser-focused, they might be on Lion’s Mane. This brain-boosting, lobster-flavoured mushroom can be cooked, dried, steeped as tea, or extracted. Lion’s Mane mushroom kits produce fluffy white “fur” when kept humid, and you can expect 2-3 harvests. Known for supporting nerve growth and reducing inflammation, it’s a favourite among brain health enthusiasts.
WHAT’S IN THE KIT?
Intermediate mushroom grow kits usually include:
- Pre-colonised substrate: The medium where your mushrooms will grow, already infused with mycelium.
- Humidity bag: Essential for maintaining moisture.
PREPARE THE KIT
- Open the marked areas of the plastic to let the mushrooms grow.
- Follow the included instructions carefully, as different varieties may have specific needs.
OPTIMAL GROWING CONDITIONS
1. Temperature
Each mushroom variety has its royal temperature range, but it’s best to aim for the lower side of the spectrum for optimal yields:
- Golden Oysters: 20–24°C (they love the warmth).
- Black Pearl Oysters: 15–20°C (they prefer cooler vibes).
- Lion’s Mane: 16–22°C (moderate is key).
2. Humidity
Mist the mushroom grow kit 2-3 times a day with clean water. Mushrooms thrive in humidity levels around 85% or higher, but don’t overdo it—excess moisture can cause rot. Aim for a surface that’s damp, not soaked.
3. Light
Your mushrooms prefer soft, indirect lighting. No need to turn them into sunbathers!
TIPS FOR GROWING YOUR MUSHROOMS
1. Be patient
- Golden Oysters: Look for the first mushrooms in 5-9 days. Wait for the caps to curl upwards before harvesting.
- Black Pearl Oysters: These typically appear in 7-12 days. Harvest when the caps curl upwards and are fully open but before they start dropping spores.
- Lion’s Mane: They take their time—expect the first signs in about 7-12 days, but full development can take another 3-5 weeks.
2. Harvesting
Use a clean knife to harvest or gently twist and pull.
3. Go for round two (or more!)
Continue misting and maintaining humidity. You can often get a second or third flush in the weeks that follow.
Mushroom growing isn’t just about delicious food—it’s a journey. With the right mushroom grow kit, patience, and care, you’ll not only enjoy culinary delights like Golden Oysters, Black Pearl Oysters, and Lion’s Mane, but also benefit from their impressive health perks. So go ahead—mist, harvest, repeat!
STARTING OF A SERIOUS MUSHROOM CULTIVATION: A COMPREHENSIVE GUIDE
As you embark on the journey of serious mushroom cultivation, understanding the process, essential tools, and techniques is crucial for success.
First things first: mushrooms are in their own kingdom. It’s not a plant nor an animal. Therefore, the lifecycle is different from what we imagine. The life cycle of a mushroom involves four stages:
- Spore germination: Spores germinate into mycelium under the right conditions, such as high humidity and optimal temperature.
- Colonization: Mycelium spreads through the substrate, gathering nutrients.
- Fruiting: Environmental triggers like humidity and temperature changes lead to the formation of mushrooms.
- Sporulation: Mushrooms release spores to start the cycle anew.
To start growing like a pro and to support each stage of its life, gather essential equipment:
1. SPORE GERMINATION TO MYCELIUM
The essential tools focus on creating a sterile environment. What will you need:
- Sterile agar plates: Provide a nutrient-rich medium for spores to germinate and grow into mycelium. When you get the spores in a syringe, inoculate spores onto agar plates in a sterile environment (e.g., using a flow hood or still air box). Mycelium grown on agar plates can be transferred to other substrates to expand the mycelium mass.
- Spore syringe: To inject spores onto agar plates or into substrates under sterile conditions (again: using a flow hood or still air box).
- Flow hood or still air box: To prevent contamination.
- Temperature & humidity: Maintain optimal conditions for spore germination and mycelium growth.
2. COLONIZATION
There are a few ways to colonize: you can use mycelium you grew in agar plates or substrates or you can buy ready-to-transfer spawns. Spawn is essentially mycelium that has been grown on a substrate like grains (e.g., rye, oats) or sawdust. It acts as a carrier of the mycelium, allowing it to colonize bulk substrates efficiently. You can get Chaga and Shiitake plug spawns or liquid cultures from Ungu. What will you need in the process:
- Sterilized substrate: For mycelium to grow. Depending on the mushroom you are growing, this could be sterilized grains (e.g., rye, oats), straw, or sawdust.
- Syringes for inoculation: Always use gloves and a mask in the process to avoid contamination. Sterilize equipment with a pressure cooker or autoclave, also use 70% isopropyl alcohol to sanitize surfaces and tools.
- Plug or sawdust spawn: If colonizing mushrooms onto logs or trees, use plug or sawdust spawn. Drill holes (6 mm for plug spawn or 12 mm for sawdust spawn), inoculate, and seal holes with soy wax to prevent contamination.
3. FRUITING
- Move the colonized substrate to a fruiting environment with controlled conditions. This involves adjusting humidity, temperature, and lighting to trigger mushroom growth.
- Provide soft, indirect light. Some species like Shiitake and Chaga benefit from low light conditions, while others may require more.
- Ensure gentle air circulation to maintain optimal CO₂ levels, crucial for fruiting.
- Harvest your mushrooms when caps are fully open but before spores drop. Use a clean knife or gently twist and pull.
ENVIRONMENTAL CONDITIONS FOR SPECIFIC MUSHROOMS:
- Sheitake: Fruiting temperature around 10°C to 15°C, with high humidity and indirect light.
- Chaga: Typically fruits in colder conditions, around 2°C to 10°C, with minimal light.
- Certain Cultures: Fruiting temperature around 21°C to 27°C, with high humidity and low light.
TRANSITIONING TO FRUITING CONDITIONS:
- Humidity: Maintain levels close to 100% for optimal growth.
- Temperature: Adjust based on the species, but generally between 15°C and 24°C.
- Light: Provide a 12/12 light cycle with low-intensity light (e.g., T5 grow lights at 6000-7000K).
STERILIZATION TECHNIQUES:
- Using a pressure cooker: Sterilize substrates at 15 PSI for 30-60 minutes.
- Using an autoclave: Sterilize at 121°C for 15-30 minutes.
- Sanitizing with alcohol: Use 70% isopropyl alcohol to wipe down surfaces and tools.
WHAT YOU WILL NEED TO START:
- Spores or spawn
- Substrate: Select a suitable substrate like straw, sawdust, or compost.
- Sterilization tools: A pressure cooker or autoclave for sterilizing substrates or get ready-to-use ones from UNGU.
- Growing containers: Mason jars, monotubs, or plastic bags.
- Hygrometer & thermometer: For monitoring humidity and temperature.
- Spray bottle: For maintaining humidity.
By following these steps and using the right tools, you can successfully cultivate mushrooms from colonization to fruiting.
Happy growing! 🍄
GUIDE TO SHIITAKE
Here you’ll find tips on how to cultivate Shiitake mushrooms: from selecting the right log to harvesting and enjoying your homegrown mushrooms with tasty recipes.
GUIDE TO CHAGA
A comprehensive guide to cultivating Chaga mushrooms: learn how to select the right birch trees, inoculate Chaga spawn. You’ll also discover some of the most popular recipes to enjoy your harvest.
GUIDE TO REISHI
Learn how to grow medicinal Reishi mushrooms from setup to harvest and explore various ways to enjoy their health benefits. This guide covers everything you need to know about growing Reishi mushrooms.
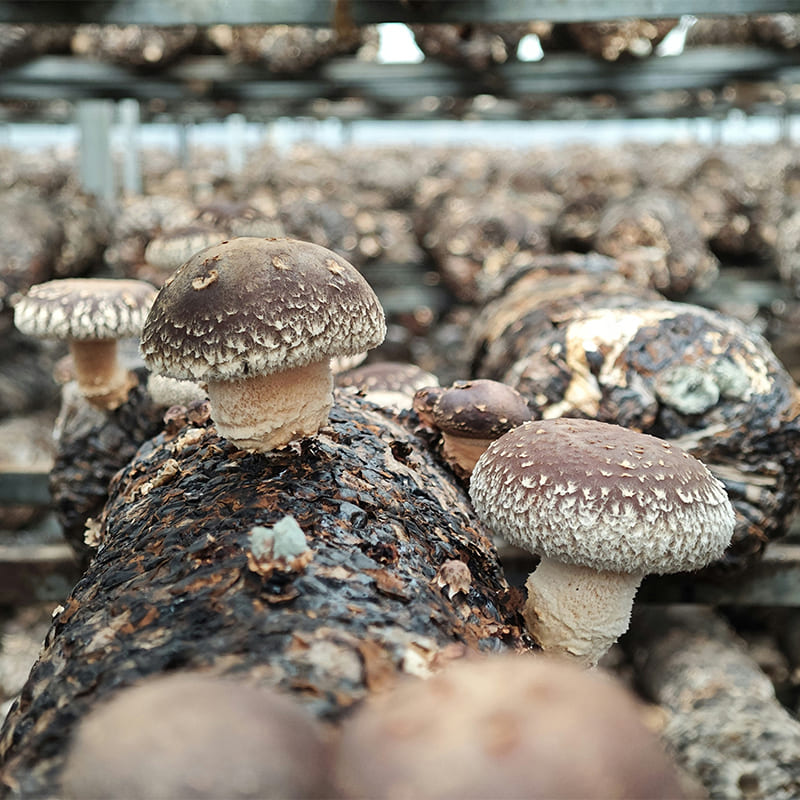
Growing Shiitake mushrooms: a guide from spawn to harvest
Shiitake mushrooms (Lentinula edodes) are known for their rich, umami flavor and potential health benefits—such as boosting the immune system and supporting heart health. They are easy to cultivate and ideal for beginners due to their quick colonization and reliable production.
How to Grow Shiitake Mushrooms from Spawn?
Shiitake mushrooms can be grown on logs, sawdust, or straw. With the help of plugs, Shiitake mushrooms can be easily cultivated in alder, beech, hophornbeam, hornbeam, hard maple, and oak logs.
1. Choose the Right Location
Shiitake mushrooms thrive in cool to moderate climates, and they require a humid environment for optimal growth. You will need a shaded area that provides protection from direct sunlight, as Shiitakes do best in indirect light. If you are cultivating Shiitake mushrooms indoors, you can create a humid space using a grow tent or a humidity-controlled environment.
2. Start with Shiitake Spawn
To grow Shiitake mushrooms, you will need to begin with Shiitake spawn. It might come in the form of plugs or sawdust. Both types are available from suppliers like UNGU.
3. Option 1: Inoculating Hardwood Logs
Shiitake mushrooms prefer hardwood logs for their growth. Oak, beech, and maple are ideal choices, and you’ll want logs that are 7 to 20 cm in diameter. Here’s how you inoculate your logs:
- Select Logs: Choose fresh, healthy logs with no visible signs of disease or rot. Logs should be cut in the winter or early spring and left to rest for a few weeks before inoculation.
- Drill Holes: Use a mushroom inoculation drill to create holes about 7 cm deep, 3 cm wide, and spaced around 15 cm apart along the length of the log.
- Insert Spawn: Insert Shiitake spawn plugs into each hole, ensuring they are flush with the surface of the log. Use a hammer to gently tap them in.
- Seal the Holes: Seal the holes with soy wax to protect against contamination and help retain moisture.
- Incubation Period: After inoculating your logs, they will need time to incubate. Place the logs in a shaded area with high humidity. The mycelium will begin to colonize the log, and this process can take anywhere from 6 to 12 months, depending on the temperature and moisture levels. You’ll know the logs are ready when you see the white fungal growth visible on the surface.
- Fruiting and Harvesting: To encourage fruiting, you can either soak the logs in cold water for 24 hours. This mimics the seasonal temperature changes and stimulates the mushrooms to fruit. Shiitake mushrooms will begin to appear within a week or two after the logs are soaked. Harvest the mushrooms when the caps are fully opened and have a nice, rounded shape.
4. Option 2: Growing Shiitake Mushrooms with Sawdust Spawn
If you have Shiitake sawdust spawn, the process is slightly different. To use sawdust spawn, you will typically inoculate it into a growing medium such as sterilized sawdust blocks, supplementing with nutrients like bran or other organic materials. Here’s how you can do it:
- Prepare the Growing Medium: If you’re using sawdust blocks, sterilize them by heating them in a pressure cooker or autoclave to kill off any competing organisms. Or you can get a substrate that is ready to use.
- Inoculate with Sawdust Spawn: Mix the sawdust spawn into the medium. Make sure to mix it evenly to ensure that the mycelium spreads throughout the substrate.
- Incubation Period: Place the inoculated sawdust bags or blocks in a warm, dark environment for about 1-2 months to allow the mycelium to colonize the substrate. The temperature should ideally be between 20-25°C. Once the substrate is fully colonized (the block will turn white with mycelium), you can trigger fruiting.
- Fruiting: After the incubation period, move the blocks or bags to a cooler, humid environment (about 15-18°C). You should begin to see Shiitake mushrooms fruiting within 7-10 days.
Shiitake Recipe Ideas
1. Shiitake Mushroom Stir-Fry
Shiitake mushrooms are a perfect addition to a quick stir-fry. Here’s a simple recipe:
- Ingredients:
- 200g Shiitake mushrooms, sliced
- 1 tablespoon vegetable oil
- 1 onion, sliced
- 1 bell pepper, sliced
- 2 cloves garlic, minced
- 1 tablespoon soy sauce
- 1 tablespoon sesame oil
- Salt and pepper to taste
- Instructions:
- Heat vegetable oil in a large skillet over medium-high heat.
- Add the sliced Shiitake mushrooms and cook for 3-4 minutes until tender.
- Add the onion, bell pepper, and garlic, and sauté for another 2-3 minutes.
- Stir in soy sauce, sesame oil, and season with salt and pepper.
- Serve over rice or noodles for a quick and delicious meal.
2. Shiitake Mushroom Soup
Shiitake mushrooms make an excellent base for a flavorful, hearty soup. Here’s a recipe you can try:
- Ingredients:
- 200g Shiitake mushrooms, sliced
- 1 liter vegetable broth
- 1 carrot, sliced
- 1 onion, chopped
- 2 cloves garlic, minced
- 1 tablespoon soy sauce
- 1 tablespoon miso paste (optional)
- Fresh herbs for garnish (parsley, thyme)
- Instructions:
- In a large pot, heat a bit of oil and sauté the onion, garlic, and carrots until softened.
- Add the sliced Shiitake mushrooms and cook for 3 minutes.
- Pour in the vegetable broth and bring to a simmer. Let it cook for 15-20 minutes.
- Stir in soy sauce and miso paste for extra depth of flavor.
- Garnish with fresh herbs and serve hot.
3. Shiitake Mushroom and Tofu Salad
This fresh and light salad makes a great side dish or main meal. It’s packed with protein from tofu and the earthy flavor of Shiitake mushrooms.
- Ingredients:
- 200g Shiitake mushrooms, sliced
- 200g firm tofu, cubed
- 1 tablespoon olive oil
- 1 tablespoon soy sauce
- Mixed greens (spinach, arugula, etc.)
- 1 tablespoon sesame seeds
- Dressing:
- 2 tablespoons olive oil
- 1 tablespoon soy sauce
- 1 tablespoon rice vinegar
- 1 teaspoon honey
- Instructions:
- In a skillet, heat olive oil over medium-high heat. Add the Shiitake mushrooms and sauté until golden brown, about 5-7 minutes.
- In the same skillet, add the tofu cubes and cook until lightly browned.
- In a large bowl, toss the mixed greens with the sautéed Shiitake mushrooms and tofu.
- Drizzle with the dressing and sprinkle sesame seeds on top.
- Serve immediately.
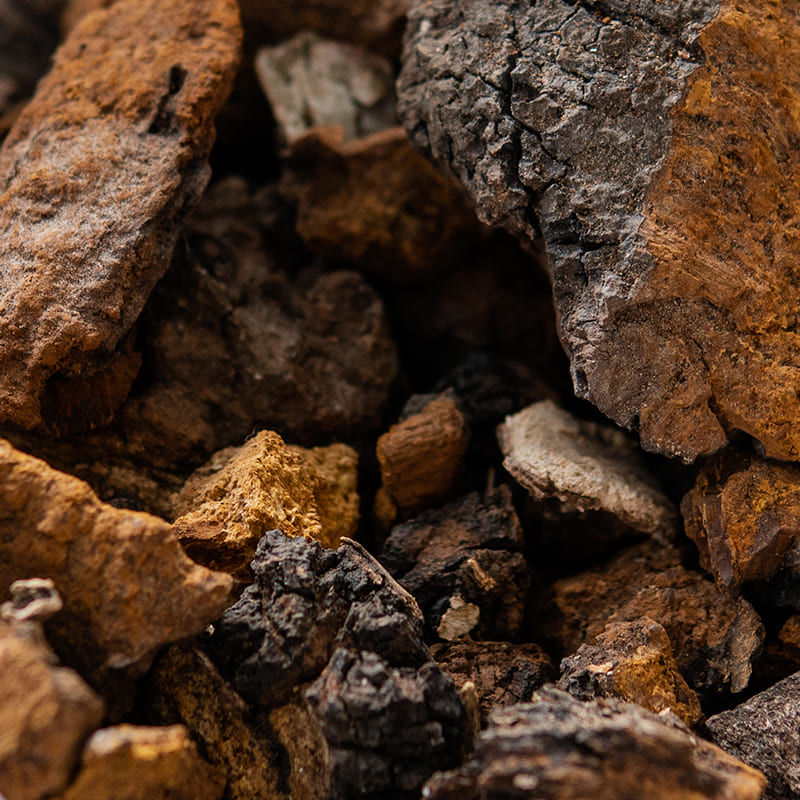
Growing chaga mushrooms: a guide from spawn to harvest
Chaga mushrooms (Inonotus obliquus) are known for their powerful antioxidant properties and immune-boosting benefits. It is believed that this mushroom slows aging, reduces cholesterol, blood sugar levels, and blood pressure. Typically used as tea. In this guide, we’ll cover how to grow Chaga from spawn and explore three delicious ways to use your harvest.
How to grow chaga mushrooms from spawn?
1. Choosing the right location
Chaga thrives in cool and damp climates, and the Baltic climate is perfect. The best way to cultivate Chaga is by inoculating healthy birch trees (that are plentiful in our region) in a shaded area with minimal direct sunlight.
2. Start with chaga spawn
To grow Chaga, you will need high-quality Chaga spawn.
3. Inoculating birch trees
- Select mature birch trees: Choose trees with a diameter of at least 20 cm.
- Drill holes for inoculation: Use a mushroom log inoculation drill to create holes about 5 cm deep into the tree bark. Space the holes around the trunk, roughly 5 cm apart. A 1-meter-long trunk requires approximately 50 plugs.
- Insert spawn: Fill the drilled holes with Chaga spawn and seal them with soy wax to protect against contamination and pests.
- Monitor growth: Chaga is a slow-growing mushroom. Have patience. It may take 3-5 years before it forms a harvestable conk.
4. Harvesting chaga
When your Chaga is ready, use a sharp knife to cut away only part of the fungus, allowing the remaining Chaga to continue growing.
Chaga recipe ideas
Once you’ve harvested your Chaga, you can enjoy its health benefits in various ways. Here are three simple recipes to get you started:
Traditional chaga tea
Chaga tea is the most common way to consume this mushroom, known for its earthy, vanilla-like taste and immune-supporting properties.
- Crush 1-2 chunks of dried Chaga (about 5 cm in diameter) into smaller pieces.
- Simmer in a pot of water (1 liter) over low heat for 2-3 hours (do not boil, as high temperatures can destroy beneficial compounds).
- You can add honey or lemon for extra flavor.
Chaga mushroom broth for soups and stews
Chaga’s umami-rich flavor makes it a great addition to broths and soups.
Ingredients:
- 1 liter of water
- 1-2 Chaga chunks (5 cm in diameter)
- 1 onion, chopped
- 2 cloves of garlic, minced
- 1 carrot, sliced
- 1 bay leaf
- Salt and pepper to taste
Instructions:
- Simmer Chaga chunks in water for 2-3 hours.
- Add vegetables, bay leaf, and seasoning.
- Let it cook for another hour, then strain.
- Use the broth as a base for soups or stews.
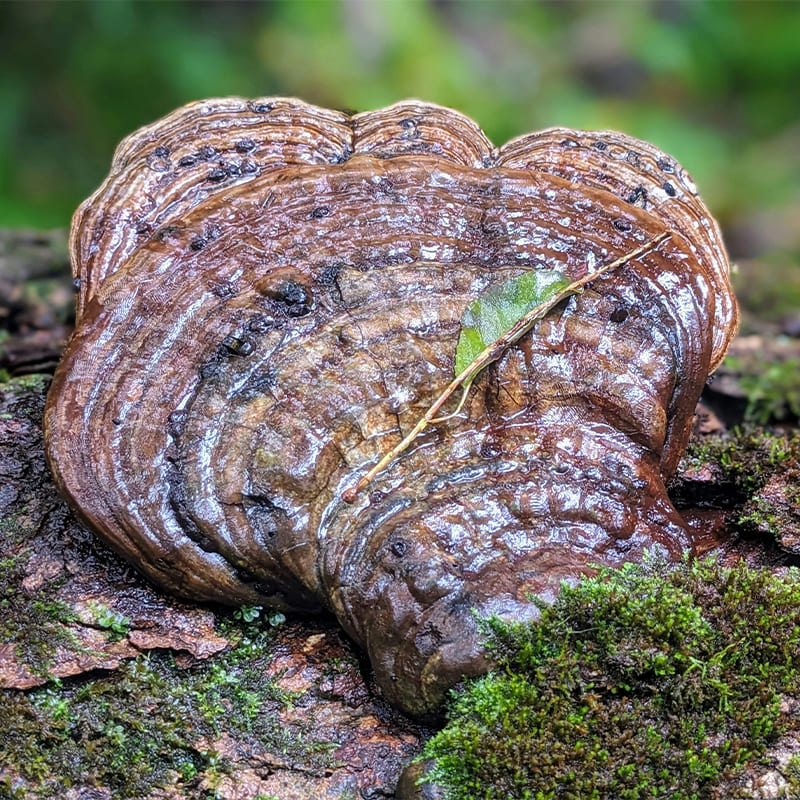
Growing Reishi mushrooms: a guide from spawn to harvest
Reishi mushrooms (*Ganoderma lucidum*) are renowned for their medicinal properties, including strengthening the immune system and improving sleep quality, earning them the nickname “”immortality mushroom.”” Their bitter taste is due to triterpenes, which are used in pharmaceuticals for treating cancer, diabetes, vascular diseases, and inflammations (especially skin conditions). In this guide, we’ll cover how to grow Reishi from reishi spawn logs and explore a couple of ways to use your harvest.
How to Grow Reishi Mushrooms from Spawn?
- Choosing the Right Location
Reishi mushrooms thrive in warm, humid environments and are typically cultivated in shaded areas. Reishi prefers slightly cooler conditions compared to many other mushrooms, with temperatures between 18°C and 24°C being ideal. A location that provides high humidity and indirect sunlight will encourage healthy growth.
- Start with Reishi Spawn
To grow Reishi mushrooms, you will need high-quality reishi spawn logs to inoculate hardwood logs or a suitable mushroom grow substrate. Hardwood logs, such as oak or maple, are ideal for inoculation with reishi spawn.
- Inoculating Hardwood Logs
- Select Logs: Reishi mushrooms grow well on hardwood logs like oak, beech, or maple. Choose logs that are 10 to 20 cm in diameter and free from pests and disease.
- Drill Holes: Use a mushroom inoculation drill to create holes in the logs, approximately 5-7 cm deep. Space the holes about 10-15 cm apart along the log’s length.
- Insert Spawn: Fill the drilled holes with reishi spawn, then seal the holes with soy wax or beeswax to protect against contamination and pests.
- Monitor Growth: Reishi is a slow-growing mushroom. It may take 1-2 years for the mycelium to fully colonize the logs and for fruiting to begin.
- Harvesting Reishi
Reishi mushrooms are ready to harvest when the fruiting bodies have fully developed and the edges of the caps are still firm. Use a sharp knife to cut the mushrooms from the log, leaving the mycelium intact for continued growth.
Reishi Recipe Ideas
Once you’ve harvested your Reishi mushrooms, you can enjoy their health benefits in various ways. Here are a couple of simple recipes to help you get started:
Traditional Reishi Tea
Reishi tea is one of the most common ways to consume this mushroom, known for its earthy and slightly bitter taste as well as its stress-relieving properties.
- Chop 1-2 slices of dried Reishi (about 5 cm in diameter) into smaller pieces.
- Simmer in a pot of water (1 liter) over low heat for 2-3 hours. Avoid boiling to preserve the beneficial compounds.
- Optionally, add honey or lemon to enhance the flavor.
Reishi Mushroom Broth for Soups and Stews
Reishi’s rich, savory flavor makes it a great addition to broths and soups, providing a nutritious base for your favorite recipes.
- Ingredients:
- 1 liter of water
- 1-2 slices of dried Reishi mushrooms (about 5 cm in diameter)
- 1 onion, chopped
- 2 cloves of garlic, minced
- 1 carrot, sliced
- 1 bay leaf
- Salt and pepper to taste
- Instructions:
- Simmer Reishi slices in water for 2-3 hours.
- Add vegetables, bay leaf, and seasoning.
- Let it cook for another hour, then strain.
- Use the broth as a base for soups, stews, or other savory dishes.
Reishi Mushroom Powder
Reishi mushroom powder is an easy and versatile way to enjoy the health benefits of this mushroom. It can be added to smoothies, coffee, tea, or even sprinkled on food for an extra boost of nutrients.
- Ingredients:
- 1-2 dried Reishi mushrooms (about 5 cm in diameter)
- Instructions:
- Slice the dried Reishi mushrooms into thin pieces (if not already sliced).
- Use a dehydrator or place the slices in an oven set to low temperature (around 50°C or 120°F) for several hours until they are completely dry.
- Once fully dried, grind the Reishi slices into a fine powder using a coffee grinder, spice grinder, or mortar and pestle.
- Store the Reishi powder in an airtight container in a cool, dry place.
- How to Use:
- Add 1 teaspoon of Reishi powder to smoothies, teas, or coffee for a health-boosting drink.
- Stir it into soups or stews for an added medicinal kick.
- You can also use it in baking or sprinkle it over oatmeal or yogurt.
FAQ
Get answers to common questions about growing, maintaining, and troubleshooting your mushroom kits for successful cultivation.

Since your UNGU Mushroom Grow Kit contains a living organism, it’s best to activate it as soon as you receive it. However, if you need to wait, you can store the kit in a cool, dry place away from direct sunlight or keep it in the refrigerator for up to six months.
Important: Pink oyster mushrooms are sensitive to cold and should not be stored below 4°C. Instead of refrigerating them, keep them in a cellar, pantry, or another cool, shaded spot.
All the mushroom species in our kits are highly vigorous, so if stored for a few weeks, they may start fruiting inside the bag. This is completely normal, but it can sometimes catch people by surprise—hence our storage and activation recommendations!
If you notice any strange colors (green, black) or foul smells before opening your bag, please get in touch with some photos. We’ll be able to determine if something happened in transit and get you a new kit. A healthy kit should have white or off-white mycelium weaving through its brown substrate and have a pleasant earthy smell.
If the mushroom block is broken upon arrival, there’s hope yet! We often see this as a result of jostling around in transport. While it’s still in the bag, we recommend gently pressing the block back together and allowing it some extra time to bounce back before cutting it open to start the fruiting process. It may take about a week to re-establish itself. If your bag is already open, gently smoosh it together as best you can and make sure to keep the block moist. We recommend using a humidity tent. Take a trash bag or other large loose bag and cut lots of ½” holes throughout – mushrooms need fresh air to form correctly! Drape the bag over your block and mist the inside of the bag every day. When you start to see baby mushrooms form (pinning), you can remove the bag and keep misting the block.
If your mushroom block looks “dead” or like nothing is happening, there are a few possible causes. Lion’s mane mycelium is notoriously fine and often appears very light or unnoticeable – especially compared to oyster kits. If you have a lion’s mane kit and the block holds together, the mycelium may be difficult to see. For other kits, it’s possible the block was broken up in transit and needs some time to grow back together. Give it a few days, making sure to keep it misted, and see if the mycelium becomes more noticeable. We guarantee all of our kits will fruit within two weeks, or we’ll send you a replacement.
If your mushroom block seems dry and hasn’t produced any mushrooms yet, try using a humidity tent. Take a trash bag or other large loose bag and cut lots of ½” holes throughout – mushrooms need fresh air to form correctly! Drape the bag over your block and mist the inside of the bag every day. When you start to see baby mushrooms form (pinning), you can remove the bag and keep misting the block.
If your block still seems dry using the humidity tent or if your block has produced once or twice and dried out in between, you can give it a boost by soaking it in some water. Take your bag out of the box and let it soak, cut side down, in a bowl of water for an hour for oysters. Let a lion’s mane kit soak for 10-15 minutes and keep an eye on it, the mycelium of these mushrooms tends to be more delicate so soaking for too long can result in your block disintegrating. Pat the block dry before putting it back in the box. Mist as you would 2-3 times per day, a little extra if you live in an arid or dry climate.
If your mushroom pins have stopped developing, low humidity is likely the cause. Don’t worry—your kit still has all the nutrients needed to grow mushrooms! Here’s how to get it back on track:
Reviving your mushroom grow kit
- Remove dried-up pins from the block.
- Let the block rest on a plate for one week to dry out slightly.
- Soak the block in cold water for 20 minutes.
- Drain any excess water if using a kit that grows inside the bag.
- Restart the process as you did initially.
Using a humidity tent for better growth
- If you didn’t use a humidity tent before, consider adding one this time.
- A humidity tent creates a moist microclimate, ideal for mushroom growth.
- To make one, drape a loose plastic bag (with small ½-inch holes) over the block and mist inside daily.
Once new baby mushrooms (pins) start forming, remove the tent and continue misting 2-3 times per day to keep the block hydrated. With these adjustments, your kit should start growing again soon!
Harvesting your mushrooms is simple! Follow these steps for the best results:
- Gently twist and pull – hold the mushroom cluster near the base and spin it until it releases from the block.
- Or use a knife – If you prefer, you can cut the mushrooms at the base with a sharp knife.
- Clean up – remove any loose bits from the block and trim off any sawdust from the mushrooms before cooking.
After harvesting, keep misting your kit to encourage another flush of mushrooms!
Unfortunately, mushrooms don’t thrive when grown directly from grain spawn. While some may eventually fruit, the yield will be very small. Instead, grain spawn works best when used to inoculate a larger substrate like:
- Hardwood sawdust
- Manure
- Compost
- Straw
(Fun fact: Oyster mushrooms will grow on all of these!)
For an easier indoor growing experience, try a Mushroom Grow Kit —it comes fully colonized and ready to grow.
Plug spawn is slower to colonize but very resilient. It requires only a drill and hammer, making it a good choice for smaller projects and beginners. It’s also the more economical option if you’re inoculating just a few logs.
Sawdust spawn colonizes logs about 30% faster than plug spawn, making it a better choice for larger projects. However, it requires an inoculation tool, along with other equipment if you want to speed up the process. If you don’t have access to a forested or shady area, the totem method using sawdust spawn can be a good alternative, and no special tools are needed.
It’s best to wait 1-2 weeks before injecting your bag. This allows time to spot any issues that may have occurred during shipping and helps avoid wasting spores or culture syringes. If you notice any contamination or problems, reach out to us at [email protected] for assistance.